SuperStutter User Manual
Welcome to SuperStutter — a Live Stutter and Glitch Engine that captures incoming audio and triggers stuttered playback at musical pitch intervals, beat-grid divisions, milliseconds, or Hz.
Core Signal Flow
Every sound in SuperStutter follows this pipeline:
Audio In → 8 Sample Buffers (continuous 8-second capture each) → Trigger → Stutter × Grain Envelope → Playback × Amp Envelope × Mix → Audio Out
- Capture: Audio constantly records into 8 independent Sample Buffers (8 seconds each), all writing simultaneously. When a New Sample event fires, the current buffer is frozen, and the next buffer begins recording fresh audio. Use the Sample Select knob to choose which buffer to stutter from (Now >> -7).
- Trigger: When a trigger fires (from pads, Sequencer, MIDI, Threshold, or "Every" timer), the engine starts stuttering from the currently selected Sample Buffer
- Stutter: Playback loops at the interval set by the current StutterLength — creating the glitch effect. The interval can be a beat fraction (1/8, 1/16…), milliseconds, Hz, or a note value.
- Shape: Two Bézier-curve envelopes sculpt each grain (Grain Envelope - upper) and the overall note (Amp Envelope - lower).
- Mix: A wet/dry knob blends the original signal with the stuttered output.
2. Getting Started
Installation
Windows (VST3)
Run the SuperStutter installer. The VST3 plugin is installed to your system VST3 folder. Restart your DAW and scan for new plugins.
macOS (AU & VST3)
Run the SuperStutter installer package. Both AU and VST3 versions are installed. Restart your DAW and scan for new plugins. Works on both Intel (x86_64) and Apple Silicon (arm64).
License Activation
After purchase, download your personalized license file from your Audija user account. On first start, the plugin will prompt you to select your license file for activation.
Quick Start — Your First Sound in 30 Seconds
- Insert SuperStutter on a track with audio playing (vocals, drums, synths — anything works).
- Make sure Trigger ON: Pads, New Sample ON: Pads, and Stutter Source: Pads are all turned on in the Mode Matrix (bottom-left). They are by default.
- Click any of the 16 pads on the left. You'll immediately hear a stutter at that pad's interval.
- Try different pads — each one stutters at a different speed (1/4, 1/8, 1/16, etc.).
- Twist the Pitch knob in the center to pitch the stutter up or down while holding a pad.
- Adjust the Mix knob (bottom-right) to blend between dry and stuttered audio.
That's it — you're stuttering! Read on to unlock the full power of the engine.
3. Interface Overview
The interface is divided into these main sections:
| # | Section | Location | Purpose |
|---|---|---|---|
| 1 | Header Bar | Top strip | Logo (Main Menu), presets, undo/redo, Input Quantize |
| 2 | Display | Top-right | Real-time oscilloscope showing input & output, record, trigger, and MIDI events |
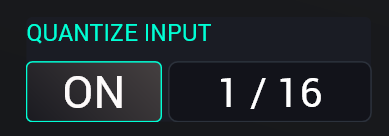
| 3 | Pad Grid | Left | 16 trigger pads (4×4), 14 with a stutter interval, pad 0 is audio-in pass-through, and the 🎹 pad sets the stutter length from incoming MIDI note pitches |
| 4 | Center Controls | Center | Pad Select, Speed, Pitch, Glide, Main Trigger (SuperStutter Button) |
| 5 | Sample Control | Right of center | Sample Select, Time Scrub, Reverse |
| 6 | Envelopes | Right panels | Upper: Grain Envelope (ADSRH) & Lower: Amp Envelope (ADSR) |
| 7 | Mix | Below envelopes | Wet/dry mix knob |
| 8 | Mode Matrix | Bottom-left | Trigger ON / New Sample ON / Stutter Source toggles (lower left corner) |
| 9 | Sequencer | Bottom-center | 4-row × 16-step pattern sequencer |
| 10 | AutoPattern | Above sequencer | 16-cell meta-sequencer for pattern chaining |
4. Header Bar
The header bar runs across the top of the plugin and contains:
- Audija Logo — Click to open the Options menu (MIDI configuration, settings).
- Preset Selector — browse, load, and save presets. Shows the current preset name.
- Undo / Redo — Step backward and forward through your editing history.
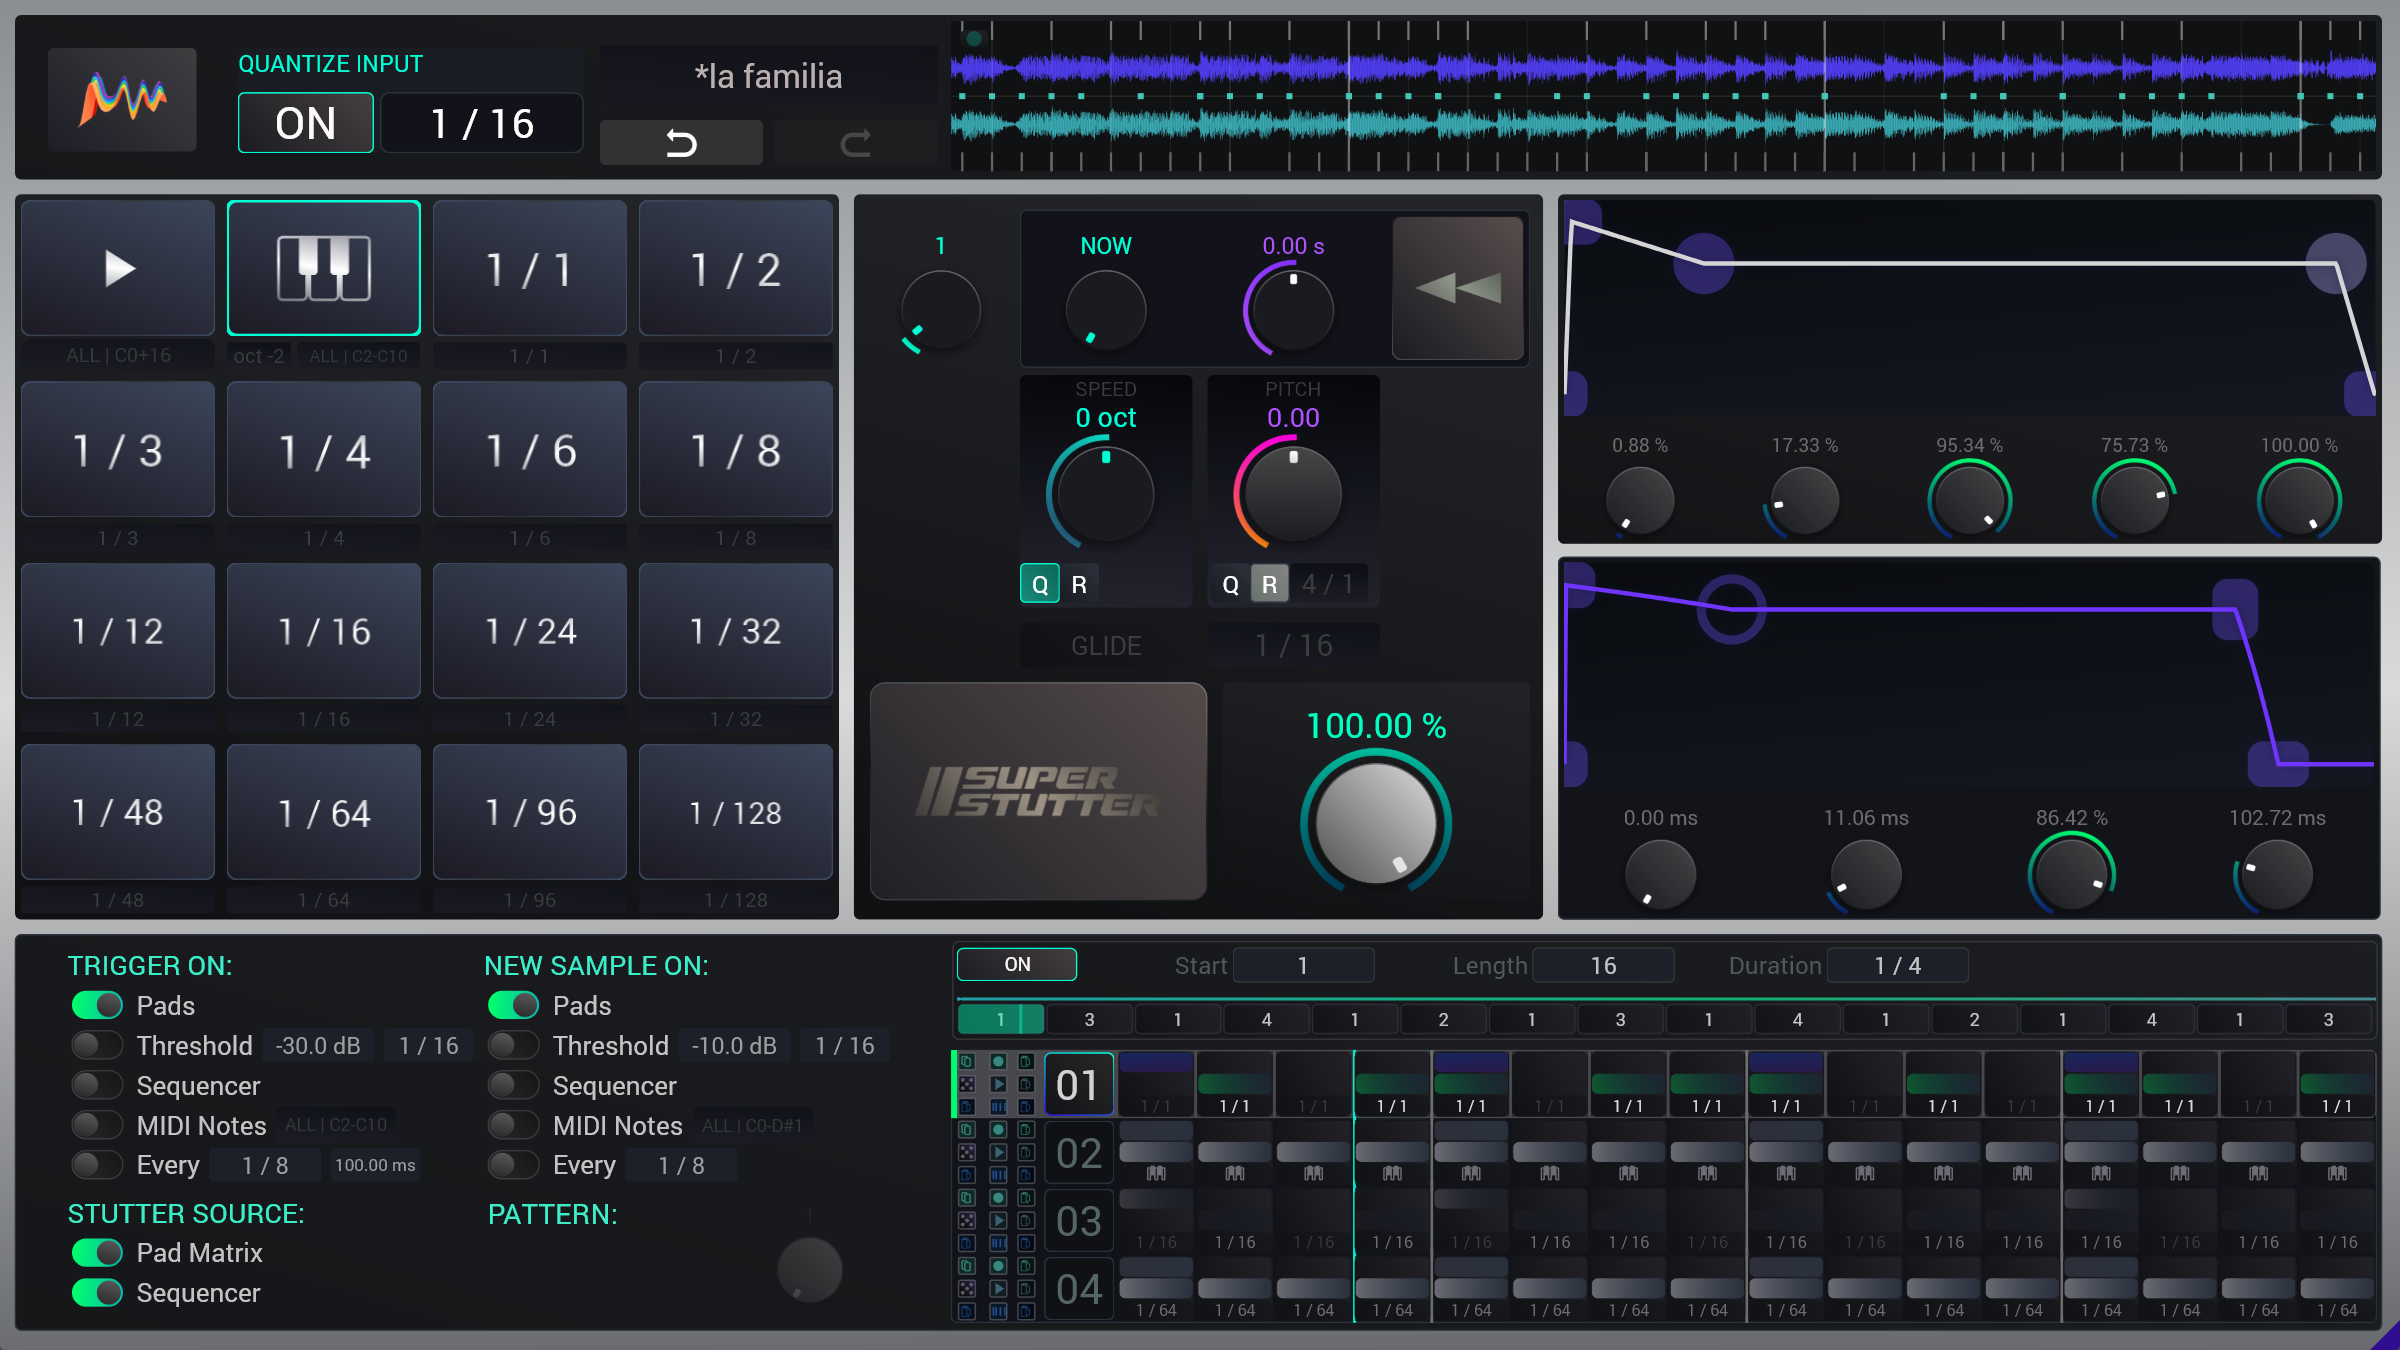
- Quantize Input — Toggle and grid value (see below).
Input Quantization
Input Quantization defers all incoming triggers (pad clicks, MIDI, threshold, etc.) to the nearest beat-grid boundary. This keeps every stutter musically aligned with your DAW's beat grid.
- ON/OFF — Toggle to enable or disable quantization.
- Grid Value — Set the quantize resolution: 1/4, 1/8, 1/16, etc. Drag or click to type.
Display (Oscilloscope)

The real-time oscilloscope sits in the top-right corner and shows a continuous scrolling view of your audio and events:
- Upper waveform — the incoming audio signal (input)
- Lower waveform — the processed output signal
- Top markers — record events (when a new Sample Buffer is captured)
- Center dots (teal) — incoming MIDI note-on signals
- Bottom markers — trigger events (when stutter playback fires)
This gives you instant visual feedback on what SuperStutter is doing: you can see exactly when triggers fire, when new samples are captured, and how the output waveform compares to the input.
5. Performance Controls
The fastest way to use SuperStutter is directly through the interface using your mouse. The left side and center panel are designed to be played live.
Triggering via Pads
Clicking any of the 16 pads instantly triggers the stutter at that pad's interval (requires Trigger: Pads, New Sample: Pads, and Stutter Source: Pads to be enabled in the Mode Matrix).
Special Pads:
- Pad 0 (RAW ▶): Passthrough — plays the captured audio back exactly as it was recorded, without stuttering.
- Pad 1 (MIDI 🎹): Uses incoming MIDI note pitches to determine the stutter interval. Includes an Octave offset drag-zone below it.
- Pads 2-15: Fixed intervals (e.g.
1/8,200 ms,C4). Drag up/down on the value to change it, or click to type a new value (typeC3to switch to Note format).
Pad Select Knob
The Pad Select knob (top of the center panel) selects which pad is active (0–15) without triggering it. This determines the stutter length used by the Main Trigger Button, DAW automation, and the sequencer's "M" (Manual) steps.
Time-Traveling (Sample Control)
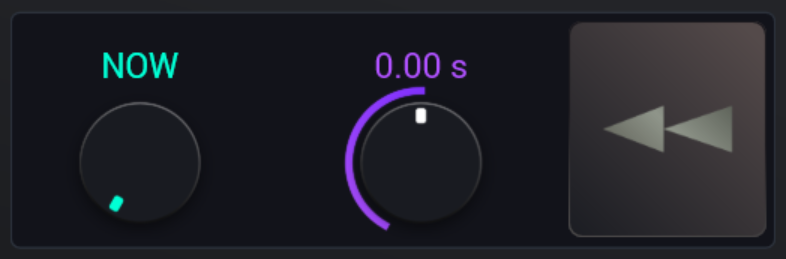
The sample control section sits right of the Pad Select Knob and controls which audio you're stuttering from and how it plays back.
| Control | Action |
|---|---|
| Sample Select | Selects which Sample Buffer to play from. NOW = the most recent capture. −1 = the one before that (jump backwards up to 8 buffers). |
| Time Scrub | Offsets the playback position within the selected Sample Buffer (±4.0 seconds). Drag to scan through the captured audio. |
| Reverse | Momentary toggle. Hold to play the stuttered sample in reverse. |
Speed & Pitch
While holding a pad (or the Main Trigger button), you can shape the stutter in real-time:
| Control | Action |
|---|---|
| Pitch | Shifts the pitch up or down (±24 st). Toggle Q to quantize to semitones. Click R to enable the Bungee auto-return curve. |
| Speed | Speeds up or slows down the stutter interval itself (±36 st). Toggle Q to jump in octave intervals. Click R to enable the Bungee auto-return curve. |
Glide
When Glide is ON, switching pads smoothly glides the stutter interval from the old length to the new one over the specified Glide Time — creating rubber-band / pitch-bend effects. Toggle it on/off with the Glide button, and set the glide duration in the time field next to it.
Main Trigger Button (SuperStutter)
The large SuperStutter button in the center fires a trigger using whichever pad is currently selected via the Pad Select knob. It's a convenience button — equivalent to pressing the selected pad directly. Hold it to sustain the stutter, release to stop.
6. Mode Matrix
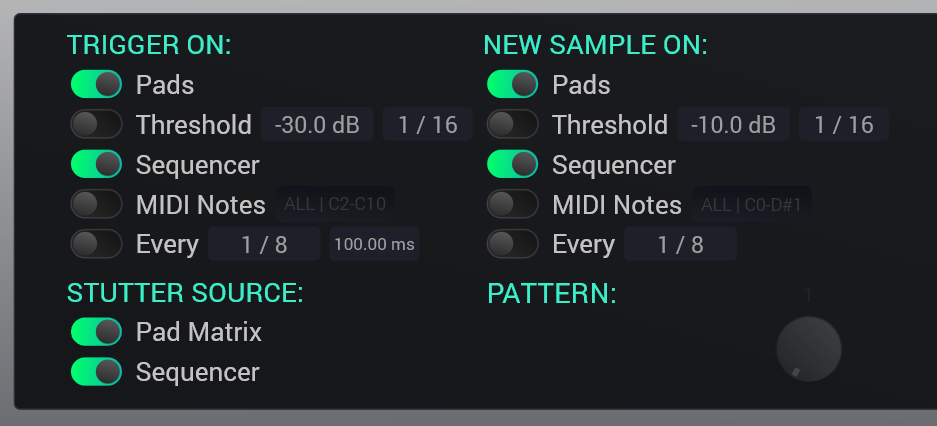
The Mode Matrix is the most powerful section of SuperStutter. It answers three questions every moment:
- "Should I TRIGGER playback?" — controlled by the TRIGGER ON toggles
- "Should I CAPTURE a new sample?" — controlled by the NEW SAMPLE ON toggles
- "WHICH PAD determines the stutter length?" — controlled by the STUTTER SOURCE toggles
TRIGGER ON (5 toggles — any combination)
Each source that is ON can fire a trigger. Multiple sources combine with OR logic — if any active source wants to trigger, the stutter plays.
| Source | What fires it | Extra controls |
|---|---|---|
| Pads | Clicking a pad in the UI, or DAW automation of the Trigger Pad parameter (the Main Trigger Button (SuperStutter) mirrors whichever pad is selected — a convenience button equivalent to pressing the individual pads. Choose what you prefer; both work) | — |
| Threshold | Input audio exceeds a dB level | Threshold (dB), HoldOn (how long to hold the trigger) |
| Sequencer | Active steps in the step sequencer pattern (green cells) | — |
| MIDI Notes | MIDI note-on messages (configurable channel & range) | MIDI config |
| Every | Periodic re-trigger at a fixed interval | Interval (beats/ms), Hold duration (beats/ms) |
NEW SAMPLE ON (5 toggles — same sources)
Controls when a new sample is captured into a Sample Buffer. Same 5 sources as Trigger ON. When a "New Sample" event fires, the current buffer is frozen and becomes the "NOW" buffer, previously captured buffers move one position down (Now to −7, where −7 marks the eighth most recent capture).
| Source | What fires it | Extra controls |
|---|---|---|
| Pads | Clicking a pad in the UI, or DAW automation (the Main Trigger Button also fires a capture if Record:Pads is enabled) | — |
| Threshold | Input audio exceeds a dB level | Threshold (dB), Holdoff (How long forbidden to trigger again) |
| Sequencer | Active Record steps (top zone) in the step sequencer pattern (blue cells) | — |
| MIDI Notes | MIDI note-on messages (configurable channel & range) | MIDI config |
| Every | Periodic capture at a fixed interval | Interval (beats/ms) |
STUTTER SOURCE (2 toggles)
Determines where the stutter length comes from:
- Pad Matrix — stutter length comes from whichever pad is currently selected (via UI clicks or MIDI input)
- Sequencer — stutter length comes from sequencer
When both are active, Pad Matrix wins while a pad is being held (UI or MIDI). When released, the sequencer takes over.
• Trigger and Record: OR logic — any active source can fire
• Pad selection: Priority chain — UI Pads > MIDI Input > Sequencer
7. MIDI
SuperStutter supports 4 independent MIDI input configurations.
| MIDI Config | Purpose | Details |
|---|---|---|
| Pad Matrix | Maps 16 MIDI notes to 16 pads | Fixed range: base note + 16. E.g., C3 → C3–D#4 maps to pads 1–16. Play pads from your MIDI controller like a drum machine. |
| 🎹 Pad | Stutter length follows MIDI note pitches | The 🎹 pad provides stutter length based on incoming MIDI. Its Channel & Range settings are located below the pad. |
| MIDI Trigger | Fires the trigger from MIDI | Any MIDI note in the configured channel/range fires a trigger (like pressing the Trigger button). Requires "MIDI Notes" to be ON in Trigger toggles. |
| MIDI Record | Captures a new sample from MIDI | Any MIDI note fires a new sample capture. Requires "MIDI Notes" to be ON in Record toggles. |
Channel & Range Settings
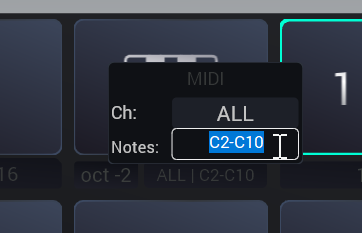
Each MIDI config shows a compact button displaying the current settings (e.g., ALL | ALL, Ch 1 | C3+16, or NONE).
- Channel: NONE (disabled), ALL (any channel), or Ch 1–16
- Note Range: ALL, a specific range (C1–C3), or a base note + count
Click the MIDI label (e.g. ALL | ALL or Ch 1 | C3+16) to open its configuration popup with Channel and Note Range fields.
8. Step Sequencer

The step sequencer drives automated trigger, record, and pad-selection events in sync with your DAW's beat grid. Think of it as a programmable addition to live UI or MIDI performance.
To turn it fully on: Trigger On / New Sample On and Stutter Source must all have Sequencer toggled on, but you can also choose just individual aspects of it (e.g. use only the new sample signals).
Step Programming
There are 4 storable patterns, switchable via the Pattern Select knob. Each pattern has 16 steps at 1/16th resolution. Each step cell is divided into 3 clickable zones stacked vertically:
- Top zone (Record) — click to toggle the "New Sample On" state for this step
- Middle zone (Trigger) — click to toggle the trigger state
- Bottom zone (Pad) — click to open the Pad Selector popup to define which pad (0–15) this step triggers. Right-click to set it to "M" (Manual mode — ignores the sequencer's pad choice and uses whatever pad is currently selected in the UI/MIDI).
- Drag across steps — drag horizontally across any sub-row to paint states across multiple steps quickly.
Row Tools
- Target Selector (left of each row) — shows which pad the row targets when triggering.
- Copy / Paste — copy an entire row's pattern and paste it elsewhere. Use the sub-lane paste buttons to paste only specific zones (record, trigger, or pad assignments).
- Dice (Randomize) — randomize states: 🎲 All, 🎲 Record, 🎲 Trigger, or 🎲 Pad assignments.
✅ Trigger ON: Sequencer
✅ New Sample ON: Sequencer
✅ Stutter Source: Sequencer
You can also enable just individual aspects (e.g. use only the trigger or only the new sample signals).
Automating Patterns: The AutoPattern Engine
Instead of manually switching between your 4 programmed patterns, use AutoPattern. It sits above the step sequencer and acts as a meta-sequencer, automatically cycling through your 4 sequencer patterns to create long, evolving arrangements.
| Control | Description |
|---|---|
| ON / OFF | Master toggle — enables automatic pattern cycling |
| Start | Which cell the loop begins at (1–16) |
| Length | How many cells the loop spans (1–16) |
| Duration | How long each cell plays before advancing (e.g. 1/1 for a full bar, 1/4 for a beat). |
Editing Cells: Drag vertically on any cell to change its pattern assignment (1–4). Drag horizontally to paint that pattern across multiple cells. The playhead cursor shows the currently active cell.
9. Presets & Automation
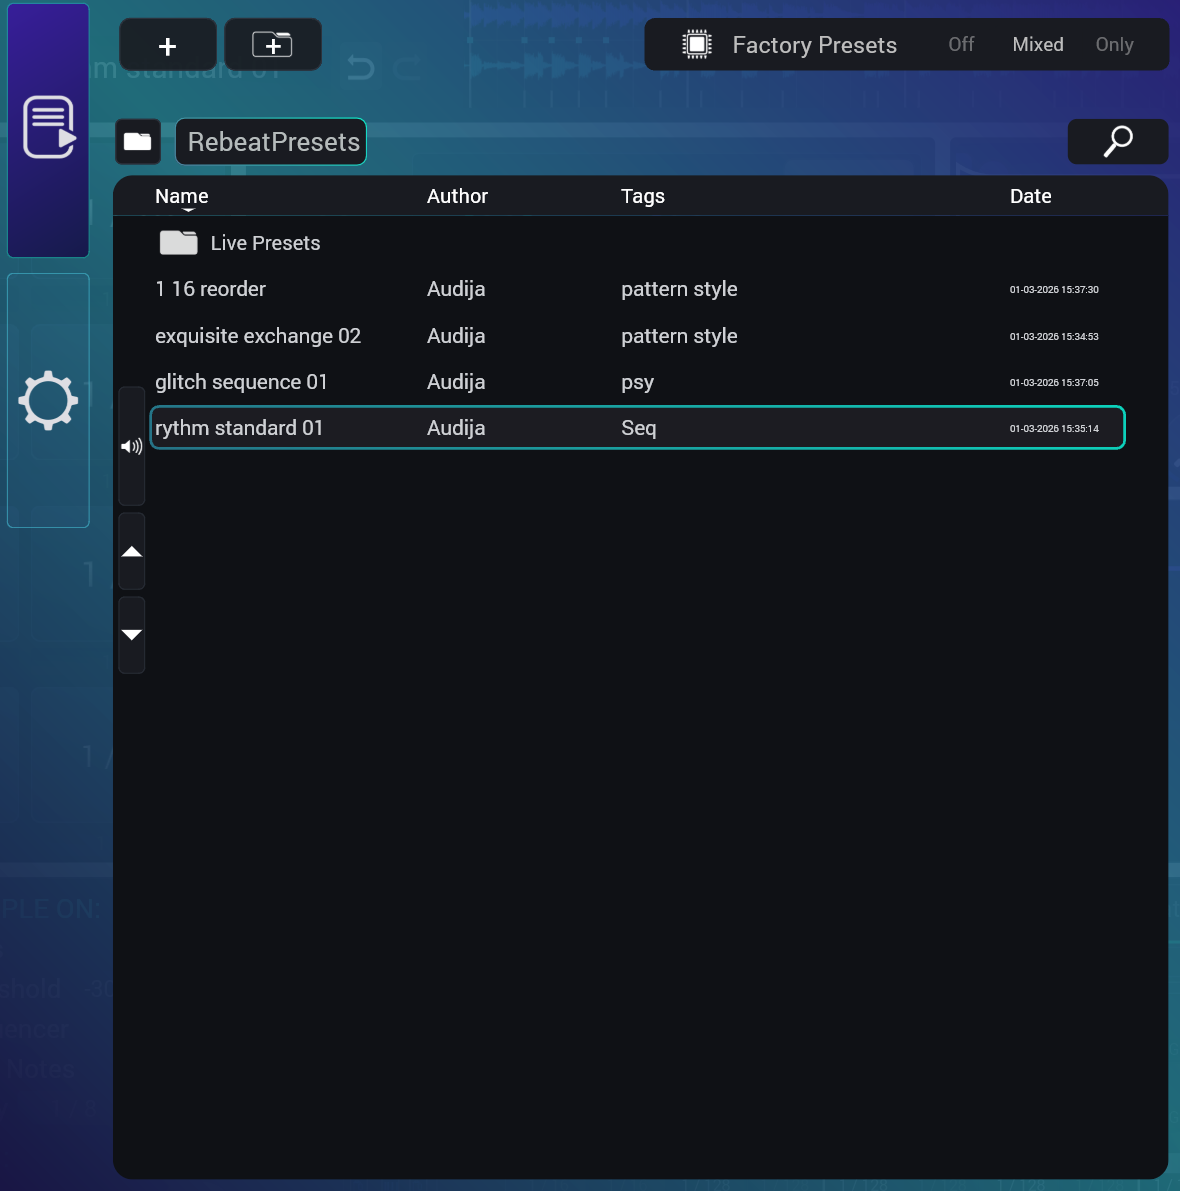
Click the Audija logo in the header bar to open the main menu, then select the Presets tab to open the preset browser.
What's Saved in a Preset
Everything about your current sound design:
- All 16 pad values (stutter intervals, formats, octave offsets)
- All 4 sequencer patterns (trigger/record states, pad assignments per step)
- All toggle states (trigger/record/stutter sources)
- All knob values (mix, pitch, stutter scale, octave, glide)
- AutoPattern configuration (cells, loop region, duration)
- Both envelope shapes (knob values + Bézier curve control points)
- Input Quantize state and grid
- MIDI configuration
Basic Operations
- Browse — scroll through presets in the browser
- Load — click a preset to load it
- Save — save the current state as a new preset
- Undo / Redo — available in the header after any change
DAW Automation
All major controls in SuperStutter are fully automatable from your DAW. Write automation lanes to create evolving stutter patterns over time. The Individual Pads parameters are intentionally removed to simplify the automation lane, favouring MIDI Note automation via the "Pad Matrix" for sequencing.
Automatable Parameters
| Category | Parameters |
|---|---|
| Main | Mix, Pitch, Speed, Octave |
| Pads | Pad Select, Trigger Pad |
| Glide | Glide On, Glide Time |
| Input Quantize | Input Quantize On, Input Quantize Time |
| Pattern | Pattern Select |
| Trigger ON | Trigger: Pads, Threshold, Sequencer, MIDI, Every |
| Trigger Settings | Trigger Threshold dB, Trigger Every Time, Trigger Threshold Holdoff, Trigger Every Hold |
| Stutter Source | Stutter: Pads, Stutter: Sequencer |
| Record ON | Record: Pads, Threshold, Sequencer, MIDI, Every |
| Record Settings | Record Threshold dB, Record Every Time, Record Threshold Holdoff |
| Grain Envelope | Grain Attack, Decay, Sustain, Release, Hold |
| Amp Envelope | Amp Attack, Decay, Sustain, Release |
| Quantize | Pitch Quantize, Speed Quantize |
| Sample Control | Sample Select, Time Scrub, Reverse |
| AutoPattern | AutoPattern On, Start, Length, Duration |
| Bungee Returns | Bungee Pitch Return, Stutter Return, Octave Return |
• Automate Pad Select to sequence stutter intervals without the step sequencer
• Automate Speed for build-ups (ramp from 0 st to +36 st over time)
• Automate Trigger Pad on/off to fire stutters at specific moments
• Automate Reverse for dramatic tape-stop effects
10. Options & Config
Click the Audija logo in the header bar, then select the Options tab to access global plugin settings and default configuration management.
Settings
| Setting | Description |
|---|---|
| MIDI Input Quantization | When ON, incoming MIDI note triggers are deferred to the Input Quantize grid (the same grid used for UI triggers). This keeps MIDI-triggered stutters beat-aligned. When OFF, MIDI notes trigger immediately regardless of the Input Quantize setting. |
| MIDI IQ NoteOff | Controls how MIDI note-off events are handled when MIDI Input Quantization is active. Click to cycle through three modes: • OnRelease — note-off fires immediately when the key is released • Preserve — note-off is delayed to preserve the original note duration • Quantized — note-off is snapped to the next grid boundary This setting is only visible when MIDI Input Quantization is ON. |
| Base Hz (A4) | Sets the tuning reference frequency for A4, used when converting note values to Hz. Range: 380–480 Hz. Default: 440 Hz. Adjust this if your project uses a non-standard tuning reference. |
Default Config Buttons
- Save as Default Config — saves the current plugin state (all pad values, sequencer patterns, toggle states, knob positions, envelope shapes, MIDI configuration, etc.) as the default. Every new instance of SuperStutter will load this configuration instead of the factory default.
- Load Default Config — resets the current instance to your saved default configuration. If no default has been saved, it loads the factory default state.